
Having a planner is a necessity to anyone who wants a more structured and efficient life. But trying to figure out what planner to buy can be overwhelming because of the number of planners available on the market and same of the high prices for the more popular planners. Because of this, bullet journaling has become a popular alternative to conventional planners.


But what is bullet journaling?
Bullet Journaling is an analog system created by Ryder Carroll meant to have the combined functions of an agenda, a to-do list, a journal, and a cork board. By using it, you can take any notebook and can track calendar events and write different sets of to-do lists, logging lists (like movies you want to watch or book you’ve completed), or habit trackers all in one place. You can also write journal entries where you talk about your day or just ideas that you have about something that made an impact on you. In addition, you can add any outside papers (like receipts or business cards) by taping them into you bullet journal or putting them into a pocket folder (which can be as simple as taping an envelope to the inside cover of a notebook) in order to keep all of your information in one place.
Bullet journaling is easier than it sounds. All you need is a notebook and a writing utensil. Instead of buying agendas (some of which have become extremely expensive), ANY notebook can be used for bullet journaling.
Follow these steps in order to set up your own bullet journal.
1. Choose a notebook.
1. Choose a notebook.
2. One of your first blank pages should have your Icon Library. The bullet journal system functions the way it does because it uses symbols to represent different kinds of tasks. The new bullet journal system used a series of different symbols to signify different kinds of tasks (bullets for tasks, circles for events, and a line for notes). I personally remember the Icon Library being a bit more complicated and looking like this (as per my first bullet journal):
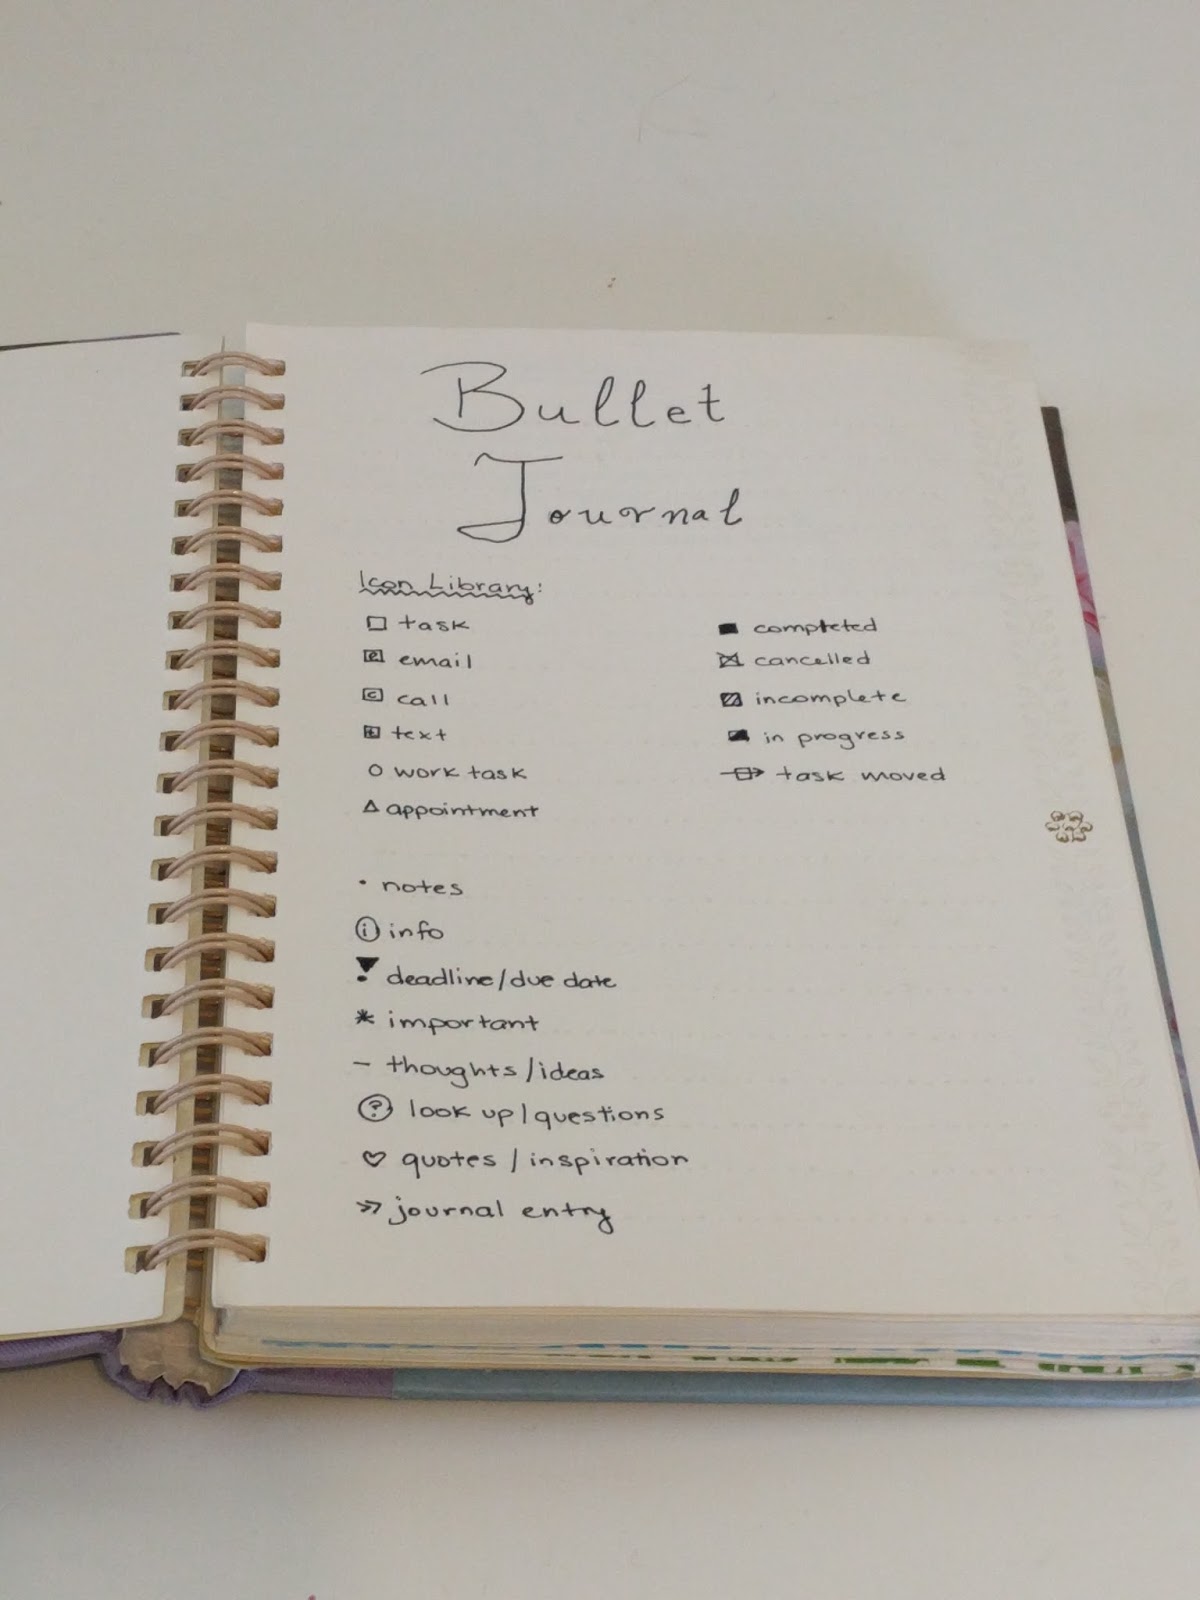
But the Icon Library can be customized to suit each journaler's individual needs. In my current bullet journal, I've down sized to a small number if icons I used regularly:

3. After creating an icon library, leave two or more pages free for your Index. The bullet journal system suggests that you number your pages so that you will be able to reference any information stored in the bullet journal by logging entry page numbers in your index.

As you fill in the pages of your bullet journal with daily to-do's, appointments, and general lists (like Movies to Watch), you can add a subject to your Index and log the page number so that you can go back and check off the movies on your list as you watch them.
4. Create a monthly spread. The suggested bullet journal set up tells you to writhethe numbers of the days of month in a vertical line going down the page and the first letter of the day of the week right next to it, like so:


On the other side of the page, you can write a monthly to-do list, goals, or track your spending.
This layout didn't work too well for me. Visually, it's too different from the monthly calendars I look at on my wall. A lot of people draw their own calendars but if you're a lazy journaler like me, printing out cute personal size monthly calendar printables is much easier. This as a result, this is what my monthly calendar looks like:

My spread includes monthly printables I receive from Design Is Yay. I receive a new monthly calendar at the end of every month for the next upcoming month. In my spread I include a list of monthly goals, notes or reminders for the month, and a list of things to buy. I also include a No Spend tracker where I circle the days I spend and cross out the days I don't. The No Spend does not track how much money I spend or what I've spent to amount on (that I log in my weekly spreads) but it does show me how often I spend money throughout the month. I made my No Spend section by using the calendar wallpapers for Mac and iPad that are sent with the Design Is Yay printables. I cut down the part that only had the dates or the month and pasted that beside my monthly calendar.
5. Now you can move on to your daily spreads. You can do anything you want with your daily spreads. They can be as simple as writing the date are listing some tasks you need complete. In fact, when I first began bullet journaling, most of my posts looked like this.

But as time went on, I found that creating a weekly spread in order to plan ahead for the rest of the week was a real lifesaver. I loved that I could use only as much space as I needed for each of my days but couldn't figure out how to remember information/tasks I needed to complete for later that week or for the next week. So I created weekly spreads that look like this:

My weekly spread includes my schedule for the week, has a week of weekly goals I want to accomplish, has space for things I am grateful for throughout the week, and a spending log. For planning ahead of the current week, I leave a blank box that I put post-it notes on, in order to remember information to put on next week's weekly spread.
After this, I move on to my daily pages. Like stated above, your daily pages can be as simple and functional as you need them to be, but I have recently gotten into minimal decorating. Because of this, I use two pages for each day in my bullet journal. My recent spreads look like this:

I need the space because I like to include a quote and word of the day (seen in the jar and the sticker besides it), a food and fitness tracker, a water intake tracker, along with my schedule for the day, any tv shows I don't want to miss, a general to-do list, a section for work where I include lesson plans, or notes for future tutoring sessions, and a space for daily reflection.
This can look a bit involved but all I've done is separate my day into sections that I think are important to keep up with or that I want to track and decorated with a small amount washi tape and stickers.
In between your daily pages, feel free to include general lists like these (wishlist, a future goals to accomplish, and bookstores to visit in NYC):

I like the bullet journal system because you can put literally anything in it. On top of these sorts of lists between your daily pages, you can also include business cards, postcards, ticket stubs, and small flowers like these (which are Baby's Breath from a bouquet of roses I received on Valentines day):

What can you do to make your bullet journal easier to use?
First, you can create a dashboard in order to house any post-its or page flags you might need. I really like the idea of carrying these supplies with me not just for my bullet journal but also for tutoring sessions. Often times, students don't have their own post-its to write notes in for books they've gotten from school or to plan small parts of their writing assignments.
You can make your own dashboard by taking a thing number of post-its and sticking them to the inside of the front cover of your bullet journal. You can set this up in any way that is aesthetically pleasing to you.
Mine looks like this:

Next, you can create small pockets in the back of your bullet journal to house receipts, stickers, or other small papers. Many people make their own pockets with craft paper and you can find these tutorials on youtube. But if you're into minimal effort like I am, you can just stick differently sized envelopes into the inside back cover of your bullet journal, to make these pockets.

What kind of notebook should you use?
A majority if bullet journalers use Moleskin or Leuchtturm1917 notebooks for their bullet journals. These notebooks have a minimalist classic look and are very plain on the inside, which is great for people who are artistic and like to decorate their bullet journals.
As I am not one of these people, I personally like to choose notebooks from Barnes and Nobles that have cute covers and that have either quotes or slight decorations on the pages. The notebook I am using now is a traveler's notebook I purchased at Barnes and Nobles and has quotes and map-themed drawing throughout.

Finally, why should you bullet journal?
Bullet journaling is a great tool for organization and efficiency. It's one of the best methods available for getting all of the details of your life in one place. It's very much like having a planner that caters to your individual needs. you can use it for memory keeping, journaling, and scrapbooking. Or not. You can use it to keep appointments, work related tasks and plans, or goal setting. You can use it to be creative and practice your drawing or stretch your artistic muscles. Or not.
At the very least I hope that this post has been helpful and has made you more interested in the bullet journal system. It's a really good system to try if you're ready to downsize from bulky binder planners and a great system to implement into your conventional planning even if your not.
If you have any questions don't hesitate to put them in the comments section.
Have a great Wednesday!


